Monday, January 14, 2013

Dec 2012 Projects

Projects started in Dec 2012 included refinishing a painted dresser for grandson David, restoring/repairing a small painted dresser for new granddaughter Abigail, refurbishing a few chairs for a kitchen, and adding shelves to a tall pantry.  A future project was also acquired.


Painted Dresser
We were looking for a dresser that didn't need much work and could be given a coat of paint and made to look good.  This was a good find at an auction for $20.  We expected to be able to sand it a little with some 100 grit sand paper and then give it a nice coat of white paint.  As we started sanding it, the paint was very old and began to chip off.  Then we had to get serious and sand more, and then we had to get more serious and use some stripper.  As we got it down to the original finish, we discovered it was solid wood and a good quality wood - Cherry wood.  So then it would be a major sin to put paint over cherry, so we went the extra few steps and refinished the dresser properly with a stain and a good finish.


Restoration/Refinish/Repairs

Sanding/Stripping paint from dresser.

Stripped applied and allowed to work overnight - plastic keeps it from drying out before stripper can work.
 
Paint has been softened overnight by the stripper agent.
 

With the paint removed and the wood sanded, we discovered that the dresser is made from solid cherry wood!

A stain has been applied and a finish over that.
A backsplash was added where the mirror used to be.  The mirror was damaged beyond repair.


New knobs were installed; wheels are ready to be installed, and the dresser restoration project is nearly complete.  Last step is delivery to Indiana.


Small Painted Dresser

We were looking for a small dresser for a new baby's room that could be cleaned up and painted white to match the rest of the room.  We found this one at any auction - it was the last item to be sold at the auction, but the price was good.

Small dresser for a new baby's room - needs some sanding and new paint. Then a few new handles and wheels and it will be better than new.
Got a little surprise - one of the drawers had a big chunk missing from the drawer bottom.
After a bunch of sanding, a coat of white paint is just what the doctor ordered.

New knobs didn't fit perfectly at first but with a little persuasion and hole enlarging, they work fine!
We had to build a frame under the dresser in order to mount a set of wheels.  With the wheels installed and a new set of handles too, it is ready to go!
Chairs for the Kitchen
 

Cleaned up and spruced up with OLD ENGLISH, these are ready for use.  Complete refinishing may be required sometime down the road, but they are very usable as they sit...


 Shelves for Tall Pantry


To better organize the shelves, a 12 inch wide shelf was added to each upper cabinet.
Future Project

We are finishing up the basement with a new family room, so have been looking for a small buffet to go in the family room.  We found this one at a thrift store for $15.  It will need refinishing, new knobs, new wheels, and some minor repairs to the drawers.  After a quick evaluation, it appears that with a certain amount of elbow grease, we should be able convert this to a piece of fine furniture soon, if the weather warms up again... 

 
Here's the finished buffet, only a few months later, making the final touch to the 3 year-long basement improvement project:  right at home under the TV.


the end

Saturday, September 15, 2012

Projects - Trip to CA Aug 2012

t
Here is the garage that needed some help getting organized.
Here's the 8' long 8' tall storage rack - built using miter saw and circular saw.
Gates built in SD shop from recycled stair rails from Habitat for Humanity's RE-STORE.  Installed at bottom of stairs in Chino.

Gate built in SD - installed at top of stairs in Chino.
Garage just begging for a workbench.
Workbench for daughter, new grandson and old grandson.  Built from 8' section of reclaimed maple bowling alley that was demolished in 2007 in Riverside, CA.
Didn't take long to fill it up - added pagboard above workbench and small shelf for screws.
Toy box reclaimed from Goodwill in Denver, CO.  Repaired and restored in shop in SD.  Added "TOYS" to top, hinges to stop the oak lid from slamming on fingers, and grandsons names to underside of lid. Delivered to CHINO.
Project is to hang flat screen on the wall and build shelf under it for audio/video components.
TV Mounting Bracket is installed and shelf assembled and put in position..
Shelf is almost ready - made from reclaimed plywood and fancy carving.

Carving was 3" short of shelf - so added a 1 1/2" piece of mahogany to each end and it worked great!  Finished carving with wipe-on poly and painted underside of shelf black.
the end

Tuesday, June 19, 2012

BASEMENT FINISH - BOAT ROOM FLOORING

June 18, 2012:  Started laying the laminate flooring in the "Boatroom".  The pattern selected was SPALTED MAPLE.
First step was to put 3/8 " strips all around the perimeter of the room.  Found out later they should be attached pretty solidly, so that you can tap your pieces against them as you install them.  The strips are a "must" to the success of the project.
Then we installed the pad.  9 am to 11:30 am.  We had to piece it somewhat in the last corner.  We couldn't find any instructions in the boxes of flooring for some time - about the 5th box, we found a set of instructions.  It said to put down one strip of pad, then lay down the flooring, then add another strip of pad, and then lay down flooring, etc.   We put the pad down over the whole floor and then started laying the flooring.  Seemed to work okay anyways.


We started out with 10 boxes of laminate flooring - each piece is 7.5 inches x 50.5 inches.


 This took from 11:30 am until 2:30 pm.
 We got back to work after a long lunch - so worked from 5 pm til 8:30 pm.


 We stopped here for the day.  We have installed six boxes, with four boxes left.  We hope we have estimated correctly.  We have to lay 5 more strips at 19 ' each, which should give us several pieces to spare.


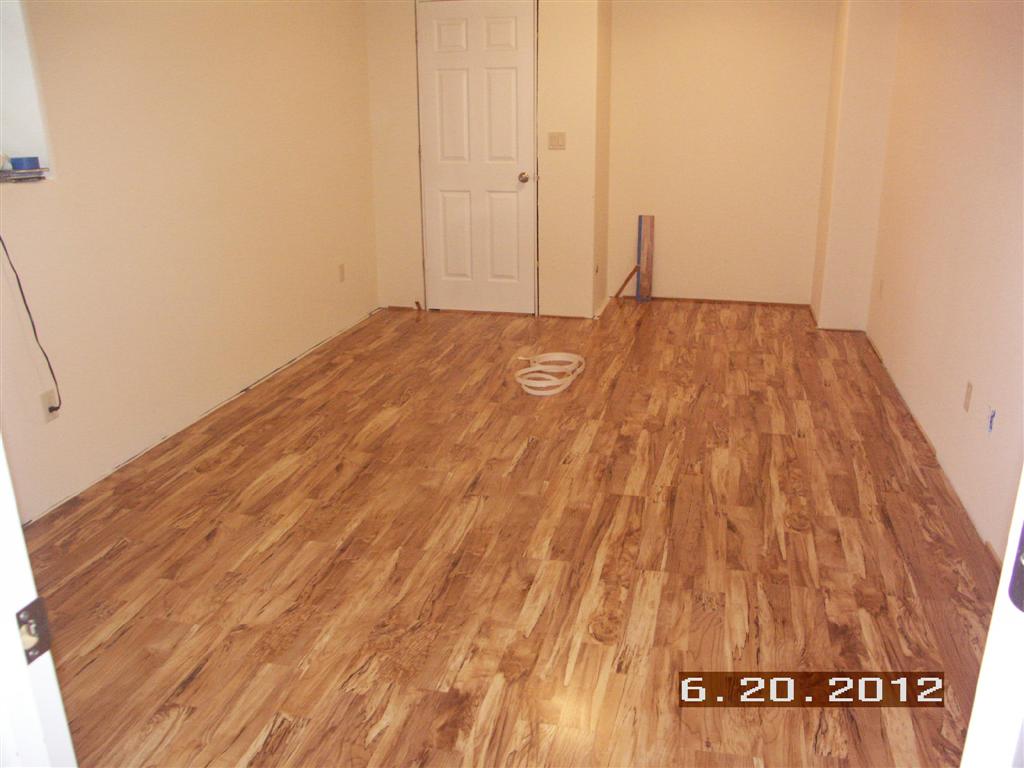
June 19, 2012 - 10 am to Noon - finished the last twenty or so pieces.  Here's the view looking into the room toward the closet and the book nook - with all but the little pieces left:

View looking out from the room toward the stairs:


One of the things that I didn't get a chance to read in the instructions ahead of this time was the Warning to make sure the last row would be more than 2.5 inches wide.  If it was going to be less, you can compensate for this by ripping a couple inches off the very first row.  This is very common practice in laying ceramic tile, but I managed to not remember this technique.   Unfortunately, my last row was between 1.25 inch wide to .625 inches wide.  This is not normally acceptable, but this small row will be covered by the base molding, so will not affect the look of the layout. 

Here's the view of the east wall before adding the tiny little strips to finish it off.

Here's the other place that needed a special cut - this piece was 1 3/8 inches wide.

Here's a view looking from the family room into the boat room.

Here's the east wall with the very tiny strips installed and glued.


Here's the view of the 1 3/8" strip in the book nook:


Kathie started bringing in samples of baseboard to see which would look best with the SPALTED MAPLE flooring:

Here's the left over pieces - 4 complete pieces and 4 with about a 1 inch strip ripped from the top side.  Note all the empty boxes stacked up - yahoo!


Here's the transition piece from the hallway ceramic tile to the laminate flooring:


Here's the transition piece from the laminate flooring to the ceramic tile in the closet.


Here's the completed flooring for the BOAT ROOM as viewed from the hallway:

So now to complete the other remaining tasks in the room, we will need to install door casings (2 doors),  paint the door casings, stain and seal the baseboard molding and cove, install the baseboard molding and cove, install a coax connector, install an ethernet connector on the 8 wire cable, and build/install the closet shelf and clothes rack.

----------------------------------------------
And in the meantime, there is another project to work on - assembling the Father's Day BBQ!


the end