Monday, April 24, 2017

Addition of Storage Shed - North of Shop - 4-24-2017

The wood creep had spread throughout the shop, so it was time to make a place for it in an out-building.

Search for a Shed Builder/Supplier

We visited several places in town for quotes (Knechts, Pro-Build, and Ziggy's).  The prices were very close for the same product.  We selected Ziggy's in Rapid City, SD, as our supplier for a 12' x 20' (+) shed with a five and a half foot side door, a window on one end and primed T11 plywood walls, that would require painting to match the other buildings on the property.  This was the best value for the price.   It was already built, as it had been built to be used as their office after the devastating fire in 2014 that destroyed a major part of the store.  Matt Ziegler said he could deliver it the next day after I called him to tell him the pad was ready.  The shed was purchased on 4-18-2017.

Site Selection/Pad Preparation
The location we chose was north of the shop for a shed for wood storage.  This would provide easy access from the shop, and a fantastic view from the shed window.  It was pretty level with only a small slope, about one foot drop over 24 feet.  We would need to build a pad that would put the shed above the water drainage area and allow for room to level it. 


We contacted The Rave Brothers (Steve Rave) to do the dirt work for a pad for the portable building.


On Thursday, April 20, 2017, Steve Rave dug up the topsoil with his Mustang and then built up the shed pad with two dump truck loads of road gravel - equal to 25 tons of rock.  That is 50 loads of rock if you used my 1/2 ton pickup.  Steve finished leveling the pad on Friday afternoon, as we left to set up of the 9th annual woodworking show at Knecht Home Center.


Shed Delivery
I called Matt Ziegler on Monday morning April 24th, to let him know we were ready with the pad anytime.  He set up a time for Tuesday at 7:30 am.  However, a snow storm was expected on Tuesday morning, so later on Monday, Matt called back to see if we were home, so that they could try to beat the storm and bring the shed out today.  We were home, and at 3:35 pm, they arrived with the shed.


Matt Ziegler and his driver delivered the shed (WIDE LOAD) to our house.  They lowered the shed to the gravel with their tilting truck, then drove out from under it and dropped it home.  The shed dropped from the truck pretty fast, so just so you don't miss a thing, here's a movie of the event in two parts:


Painting/Finishing for Use

Kathie has volunteered to help paint the building with an exterior latex and then the trim to match the trim on the house and the garage, using a semi-transparent stain.  The shed has several shelf brackets attached to the wall that can be used for storing wood.  With a little more elbow grease, the shed will be ready for use.  We will need to build a nice wide but short step at the door, replace the door lock hardware, and it would probably be a good idea to research rain gutters, as this shed has no overhang on the roof.


The followup:  what a difference a day can make - the storm did come and the decision to bring the shed on Monday was a wise decision.  It would have been very difficult to see the lines on Tuesday...


Click here to see a story about the first shed purchased back in May 2012:

Related story:    Dirtwork Projects 2012


the end of this blog

Monday, April 10, 2017

Double Pole Spring Lathe - Footpowered

I started a project that I could show at the 9th annual woodworking show sponsored by the Rapid City Woodworker's Association and Knecht Home Center.  The show is happening on April 22nd, 2017.  The project is to build a Double Spring Pole Lathe as designed by Roy Underhill.  The August 2016 issue (#226) of the Popular Woodworking Magazine published this article describing how to build the lathe.


BILL OF MATERIALS


PLANS/SKETCHES


Gluing up the posts - using some kind of 3/4 pine or similar wood.  Auction purchase, so type is unknown.


Cutting tenons on the end of posts to connect to the feet


Finally using my MOXON type vise constructed with WALMART weight bars with xxx threads.


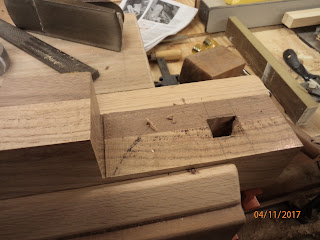
Cutting the mortises in the post to accept the rails.  Drilled first, then hand-chopped with a chisel.


Fitting the rails to the posts the first time - six tenons into six mortises.


Rails were made from construction grade lumber - 2 x 8s.


Fabrication of the rocker arm with sleeve and 1/2" bolt.

much time passes here...


How to draw the OGEE curves on the end pieces and tailstock. 

This was a long evening's exercise as I tried to remember basic trigonometry techniques.


Cutting the TALL Post to shape - including OGEE curves and slots for the poles and a taper to the top rocker arm slot.


This is the Tailstock blank with tablesaw cuts at the shoulders.  It was glued up walnut and oak.


Bandsaw cutting of straight cuts where the tablesaw could not go, and of the two OGEE curves.


Top view


Tool Rest - bottom portion - before milling - made from some exotic wood from SPLINTERS like bubinga or cocobola or Brazilian cherry:  corners needed to be rounded and a 3/8 Inch slot drilled down the middle of the piece, and a slot 1/4 deep around one end to accept the top part of the tool rest. 

Almost like drilling into steel...


yet to come


 CHOPPING A SLOT IN THE TOOL REST BASE


 MORTISES FOR WEDGES


Fabrication of more of the TOOL REST parts including the BASE, and support pieces - with a 3/8" hole through the middle of each.


 TOOL REST - UPSIDE DOWN


Need a 7 " long carriage bolt with washer and wing nut.


 POLES


Fabricating the poles - 1" square sticks (hickory) with edges chamfered to octagon shape.


 FEET WITH MORTISES AND OGEE CURVES


 WEDGES HOLDING RAILS TO POSTS

Wedges (oak and walnut) were made to securely hold the rails to the posts - another exercise in simple geometry, but using the tablesaw and a wedge cutting jig similar to Lon's shim cutting jig.

First try at fitting the wedges into the holes and checking for proper fit.  Amazingly, they fit pretty good and the frame is pretty sturdy and strong, not loose or wobbly.


TAILSTOCK


 TOOL REST


 SPRING POLES


CHOPPING HOLE FOR TAILSTOCK WEDGE


Fabrication of the treadle peddle.  Used a 12" x 18" piece of plywood with a hinge to secure it to the peddle, this made it easier to use.

Used a leather rope for treadle sewing machines from pedal to rocker arm.  Used a #10 gauge copper wire as the metal rod between the rocker arm and the spring poles.

Used pipe tape to fabricate the metal strap to hold the two spring poles together.

Used rasps and planes and sanders and routers to clean up the lathe structures.


POLE LATHE SET UP AT WOODWORKING SHOW at KNECHT HOME CENTER.


THE END is YET TO COME - things are falling into place...